Thursday, December 23, 2010

Google Provides Backup Services for Exchange Server

Google Message Continuity

Complete email continuity and disaster recovery solution in one package
Protect your organization from email outages and productivity disruptions. Minimize risk of data loss from on-premise server failures. Maintain up-to-date correspondences despite incidents affecting IT infrastructure. Leverage cloud computing to reduce maintenance, protect bandwith, and free up resources to work on strategic business initiatives.
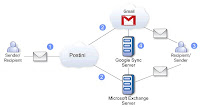


1. Postini filters inbound messages for spam, viruses, and other malicious content.
2. Postini dual-delivers inbound messages to both Gmail and Exchange.
3. Recipient accesses message through Exchange; Gmail, when Exchange is unavailable.
4. Google Sync Server continuously synchronizes changes made from one inbox to the other

Product Summary

Google Message Continuity, powered by Postini, is a cloud-based email continuity solution for organizations running Microsoft Exchange email servers. By providing Gmail as an alternate, synchronized email system, Google Message Continuity increases email availability for your organization and helps users stay productive in the event of a disaster or outage of the Exchange server. By extending the reliability, security, and functionality of Google’s services to Exchange, Google Message Continuity allows you to:
• Develop a complete email continuity and disaster recovery solution for your organization
• Maintain constant email access for users round the clock, even if your Exchange server is not available
• Minimize the risk of data loss due to on-premise server failures
• Protect your email from spam, viruses, phishing, and other email-borne threats with built-in message security features
As a cloud computing service, Google Message Continuity requires no costly hardware or appliances, helping to produce a low total cost of ownership. The service is easily managed through a simple web interface and includes customizable notification and authentication settings to inform IT administrators during Exchange server failures. Since all inbound, outbound, and intradomain messages are constantly synchronized between Exchange and Gmail, Google Message Continuity also helps ensure that users can still access their email messages, contacts and calendars during server outages so your business can keep operating.
What’s more, users can enjoy Gmail’s full functionality during Exchange outages, including 25 GB of email storage, mobile email and calendar sync, and chat. After the outage is resolved, received messages and changes made to Gmail are synced back to Exchange.
Google Message Continuity also includes a complete set of email security features, so you can provide industry-leading security for your email systems without installing expensive software or appliances. This helps you block spam, viruses, and other external threats before they reach your organization, helping protect proprietary information that must remain confidential.

Key Features

Constant email access Never go without email. If your Exchange Server goes down, enjoy the full functionality and reliability of Gmail, Calendar, and Contacts – all synchronized, all up-to-date.
Continued user productivity Seamlessly transition to Gmail during an Exchange outage so users can continue to send and receive email and retain access to contacts and calendar. Directory Sync allows login with common usernames, enabling rapid failover.
Mobile support Access Gmail, Calendar, and Contacts from your mobile device and stay productive on the go
Secure and reliable Google’s data center architecture helps keep data secure and helps ensure reliable access for your users
Email security Provides market-leading email security features including real-time spam and virus protection, content filtering for inbound and outbound email, and TLS-based email encryption.
Google Message Continuity helps you to protect, manage, and preserve access to your on-site email system by providing:
Round the clock email access Inbound and outbound messages are dual-delivered to both on-site servers and corresponding Gmail accounts, so that in the event of an on-site server failure or disruption users will retain email access and be able to continue past correspondences.
Automated email backup Google Message Continuity automates email backup by constantly synchronizing on premise accounts with corresponding Gmail accounts. And, with 25 GB of space per account, you won’t have to worry about retention periods or limits on how long your data is stored.
Mobile access Access Gmail, Calendar, and Contacts from most common types of mobile devices, enabling users to stay productive and connected on the go.
“Always on, always current” Message Security Routing messages through Google’s market-leading Google Message Security functionality provides real-time threat protection, virus detection, content-based filtering, and policy-enforced TLS encryption.

System Requirements
Google Message Continuity supports the following mail servers:
• Microsoft Exchange Server 2003 Standard and Enterprise Editions
• Microsoft Exchange Server 2007 Standard and Enterprise Editions Recipient/ Sender Gmail Postini Sender/ Recipient Microsoft Exchange Server Google Sync Server 22 3 4 1 Postini filters inbound messages for spam, viruses, and other malicious content. Postini dual-delivers inbound messages to both Gmail and Exchange. Recipient accesses message through Exchange; Gmail, when Exchange is unavailable. Google Sync Server continuously synchronizes changes made from one inbox to the other.

For More Information : http://www.google.com/postini/continuity.html#gallery

Wednesday, December 22, 2010

Find Duplicate SMTP Address

Follow the Below Steps to Find the Dupilcate EMail Address in your Exchange Org

-----------------------------------------------------------------------------
The Active Directory Users and Computers snap-in can be used to search for the address. To do this, follow these steps:

1, Run Active Directory Users and Computers.
2, Right-click the domain object and choose Find from the context menu. This will
bring up the Find Users, Contacts, and Groups window.
3, In the Find drop-down list, choose Custom Search.
4, Click the Advanced tab and in the Enter LDAP query: field, enter the following
text: proxyaddresses=smtp:balgates@contoso.com
5, Click the Find Now button
---------------------------------------------------------------------------------------

Monday, December 13, 2010

Exchange Server 2010 Backup & Restore


Back up Microsoft Exchange 2010 with Windows Server Backup

Windows Server Backup is included with Windows Server 2008 R2 and can be a great quick-and-dirty way to back up an Exchange server. Scott Lowe explains how to use this tool No matter how small the Exchange implementation, the data needs to be backed up. Many Exchange shops (particularly smaller ones) have relied on the ubiquitous Windows Server Backup utility to protect their Exchange environments against disaster.

Although there was a period of time when Exchange and Windows Server Backup didn't work together, with Windows Server 2008 R2 and Exchange 2010, this is not the case, and the backup and recovery of Exchange using this tool is a relatively simple process.

For the demonstration in this tutorial, I'll back up a single Exchange 2010 mailbox database that exists on a server named MAIL3. At Westminster College, we're currently in a pilot phase for an Exchange 2010 rollout, and we're using Windows Server Backup during this phase. Once we're in full production, we'll move to our normal enterprise backup application.

How to use Windows Server Backup with Exchange 2010
Figure A gives you a look at the Exchange Management Console view of this database. The other two databases you see reside on a different Exchange server.


We'll back up the default mailbox database on MAIL3.

Start the Windows Server Backup tool by going to Start | All Programs | Accessories | System Tools | Windows Server Backup. More than likely, you'll end up with a screen like the one in Figure B that tells you the backup tool is not yet installed on your server.

Figure B

Windows Server Backup is not yet installed.

To add the Windows Server Backup bits to your Windows Server 2008 R2 server, open Server Manager, navigate to the Features item, and click the Add Features link (Figure C).

Figure C
Click Add Features to add a new server feature.

On the Select Features page, locate the Windows Server Backup Features option and select it (Figure D). Although it's not required, it's also recommended that you install the Command-Line Tools so that you can script backup jobs if you like.

Figure D

Choose to add the backup tool.

When you get to the Confirm Installation Selections page (Figure E), look over your selections and click the Install button to add the features. At the end of the process, you will receive the results screen shown in Figure F.

Figure E

Review your selections and click Install.

Figure F

The backup tool has been installed.

Now that Windows Server Backup is installed, when you restart the utility, you'll be greeted with a screen like the one in Figure G. At the top of the window, Windows Server Backup will tell you that there are no current backups configured, and all of the informational areas of the window will be blank since there is no detail to share until after an initial backup is run.

Figure G

The Windows Server Backup window is mostly blank to start.

I'll jump right into creating a backup schedule in order to schedule a regular backup of this Exchange Server database. To start the process, go to the Action menu and choose Backup Schedule (Figure H).

Figure H

Schedule a server backup

Starting the backup schedule kicks off a wizard that begins with a welcome screen that outlines what decisions you need to make (Figure I). For the purposes of this article, I'll stick mostly with defaults.

Figure I

Backup Schedule Wizard Getting Started page

On the next page of the wizard, you're asked to decide what you'd like to back up. You can choose to back up the entire server (this includes all data, applications, and system state), or you can choose to perform a custom backup, which allows you to make granular options about what to back up. You see in Figure J that I'm performing a full server backup that will use 17.52 GB of space.

Figure J


Choose what to back up

Although the backup default is to run every day at 9:00 P.M., you can choose to run the backup at a different time (Figure K) or, if you need a shorter recovery period, can choose to run multiple backups each day. To add additional daily backups, select the button next to More Than Once A Day, specify the times you'd like, and click the Add button. After you make your choices, click the Next button.

Figure K


Decide at what time(s) each day you'd like to run backups.

With the "what" and the "when" out of the way, it's time to consider the "where" (Figure L); specifically, you need to make sure to back up your information to a location that can survive a server failure. You can choose to back data up to a hard drive that you've dedicated to this purpose. Ideally, this would be a removable drive of some kind that you can store away from the server. If you can't do this, you can back data up to an existing server volume, although you may take a performance hit and, if the server is lost in a disaster, recovery won't be possible. The option that I prefer is to back data up to a volume on a separate server. In my case, this second server resides in a different building.

Figure L


Where do you want to save backups?

When you choose the remote location option, you're told that each backup will overwrite previous backups and only the latest backup will be available (Figure M). If you need multiple backups to be available, consider other backup options.

"THE SADDEST THING IN LIFE IS WASTED TALENT"

A+/Core & Tech OS Passed Security+ Passed Network+ Passed CNST Passed MCP Passed MCSA-2003 Passed MCTS-2008 Passed MCITP-2008 Passed
CCNA Pending
0 Report
Back to top
MultiQuote
Reply

--------------------------------------------------------------------------------
Posted 22 September 2010 - 11:54 PM (#3) CompJunkie

TE Microsoft & CompTIA


Group: Technical Expert Posts: 401 Joined: 29-March 09 LocationUSA
Figure M


Heed the warning

When you choose the remote backup option, you need to specify where the backup should be saved. On the screen shown in Figure N, you'll note that backups are being written to a server named Backup and to a folder named MAIL3 on a share named Exchange10. In the Access Control section of the window, the Inherit option is selected, indicating that anyone who has access to the shared folder also has access to the backup file. As such, set carefully controlled share and NTFS permissions on the resource.

Figure N


Specify where the backup should be saved

For a remote share, you need to provide a user name and a password that has access to the backup destination (Figure O).

Figure O


Provide credentials for the remote backup location

Finally, the confirmation page appears, providing you with an opportunity to review your backup selections (Figure P). When you're done, click the Finish button.

Figure P


Review your backup selections

When you get back to the backup console, you can click the View Details link under Next Backup to see details about your pending backup. Figure Q shows this detail window for the backup we just created.

Details about the next scheduled backup

If you'd like to kick off a manual backup before the next scheduled backup, go to Action | Backup Once. On the first page of the Backup Once Wizard (Figure R), you're asked how you want to run the backup. Do you want to use the same options you used for your scheduled backup, or do you want to choose different backup options?
Figure


Backup Once options

The Backup Once Wizard provides you with a summary page. Click the Backup button to begin the backup process (Figure S). During the backup process, the window in Figure T will display on the screen so that you can watch backup progress. At the end of the process, you'll see a final completion page (Figure U).

Figure S


Backup summary page

Figure T


Backup status page

Figure U


The backup is complete.

Proof


How do you actually know that Exchange was appropriately backed up? That's revealed during the restore process. Although I'm not covering restores here, I will share the screen in Figure V; this shows that the Exchange application was backed up and that, specifically, the database on the server named MAIL3 was the one that was saved.

Figure V


The restore process reveals that the Exchange database exists in the backup.

Summary


While suitable mostly for small organizations and those running pilots, the Windows Server Backup utility can be a great way to back up your Exchange 2010 server without having to invest more dollars in software.